
How to Set Up a Tarp That Holds in Rain and Wind
Read the site, choose the weather-facing shape, build the ridgeline, and tension opposing corners.
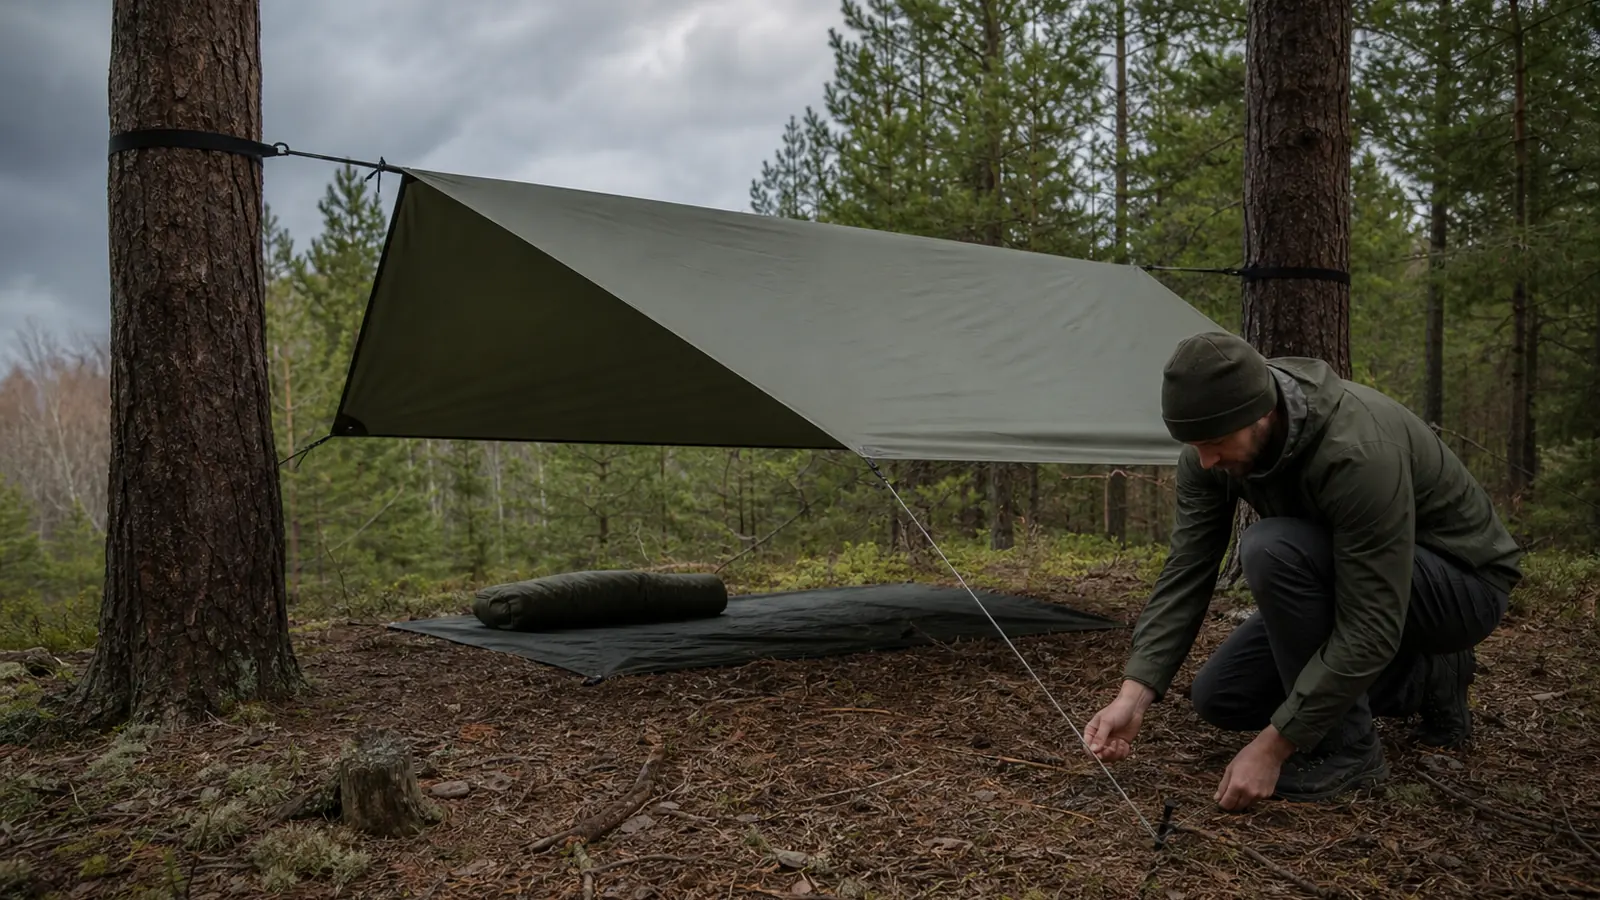
A tarp becomes a shelter only after the site, pitch, ridgeline, corners, and weather direction work together. Build one structural line, then tension opposing corners in small passes.
A tarp becomes a shelter only after the site, pitch, ridgeline, corners, and weather direction work together. Start by choosing the protected footprint, then build one structural line and tension opposing corners in small passes.
The same rectangle can be an airy sun canopy, a low rain roof, or a closed wind shed.
Copying one memorised shape without reading the site is why an apparently taut tarp pools water, flaps, or leaves the sleeping area exposed.
Build the geometry in order. Site first, weather-facing shape second, ridgeline third, corners fourth, and final retensioning after the fabric has settled.
Read the ground and wind before opening the tarp
- Trace runoff :: Keep the sleeping or working footprint above channels, hollows, compacted puddle marks, and slopes that drain through the site
- Look overhead :: Reject dead limbs, leaning trees, loose rock, and anything that could fall or move in wind
- Read wind at several heights :: Compare grass, leaves, smoke, cloud movement, and the feel of gusts around terrain or vegetation
- Choose durable ground :: Use an established pad, bare soil, gravel, rock, or another locally allowed durable surface
- Find sound anchors :: Inspect trees, poles, rocks, and stake soil before relying on them
- Protect the exit :: Leave a safe route out of the shelter that does not cross guylines, runoff, or a cooking area
Stand where your head and torso will be, not where the centre of the tarp looks attractive.
A roof pitched perfectly over a shallow drainage still creates a wet sleeping system.
Runoff clues include flattened leaves, fine debris caught against roots, a smooth channel through otherwise rough soil, and damp sediment below a slope. Move the protected footprint first, because changing guyline tension cannot redirect water already travelling underneath you.
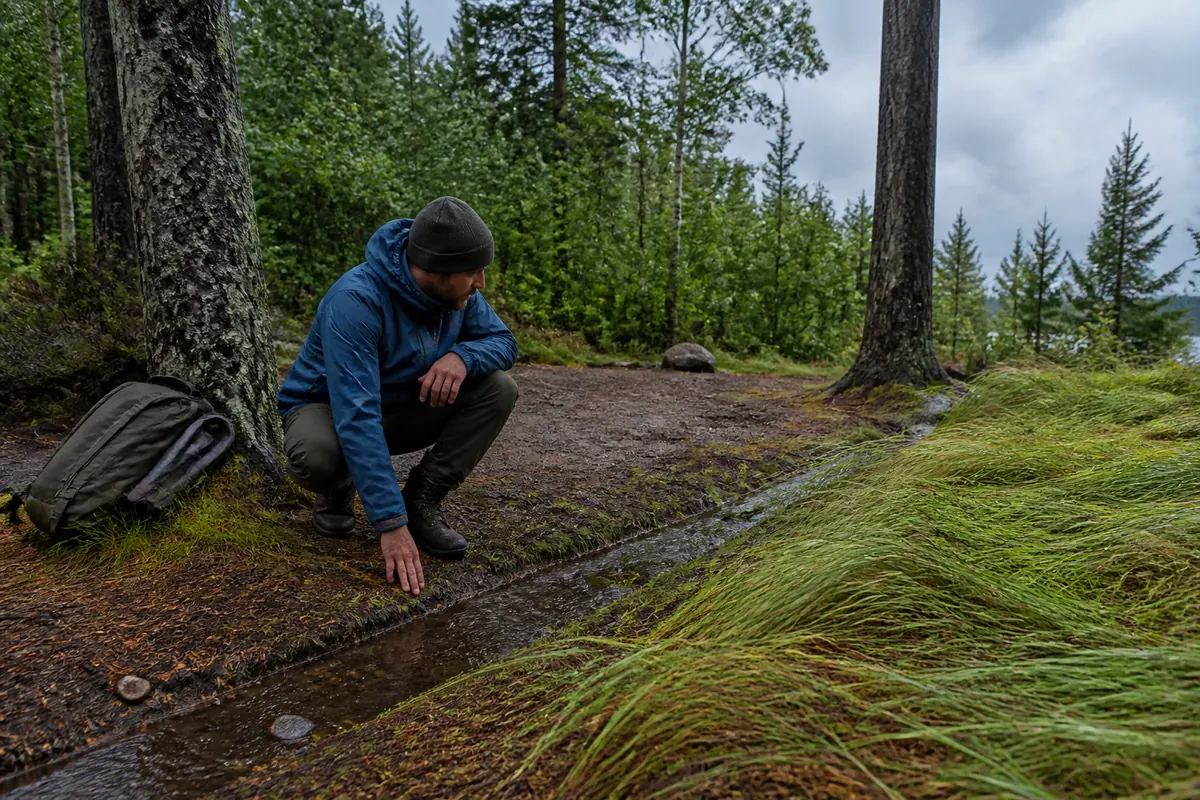
Check the canopy in daylight before you commit to the site. Dead suspended branches, cracked trunks, and leaning trees can fail without the dramatic warning people expect.
Use established sites and durable surfaces where local rules require them. Leave No Trace guidance also means avoiding new clearing, trenching, cutting live branches, or moving vegetation to force a preferred pitch.
Wind often bends around a ridge, gap, rock, or stand of trees. Watch vegetation for a full minute rather than trusting one calm moment, and plan the lowest or closed edge toward the most persistent direction.
Lay out the rig before the fabric becomes a sail
Keep every critical part reachable before exposing the tarp.
In wind, an unfolded sheet can pull attention away from missing cord, tangled lines, and unsuitable stakes.
- Ridgeline
- Cord or webbing that establishes the roof axis between trees or supported poles
- Protected anchors
- Wide tree straps, sound poles, or locally allowed anchors that do not damage bark or vegetation
- Corner guylines
- Lines long enough to reach sound ground along the fabric load direction
- Adjustable connections
- Knots or hardware you can tension and release with cold or wet hands
- Stakes or alternatives
- Anchors suited to firm soil, soft ground, sand, snow, rock, or platforms
- Spare line
- A repair and additional tie-out resource, not a substitute for inspecting the main rig
Practise your knots before the trip. REI's basic tarp sequence uses functions such as a bowline for a fixed loop, a trucker's hitch for mechanical advantage, and a prusik for an adjustable attachment, but other reliable systems can perform the same jobs.
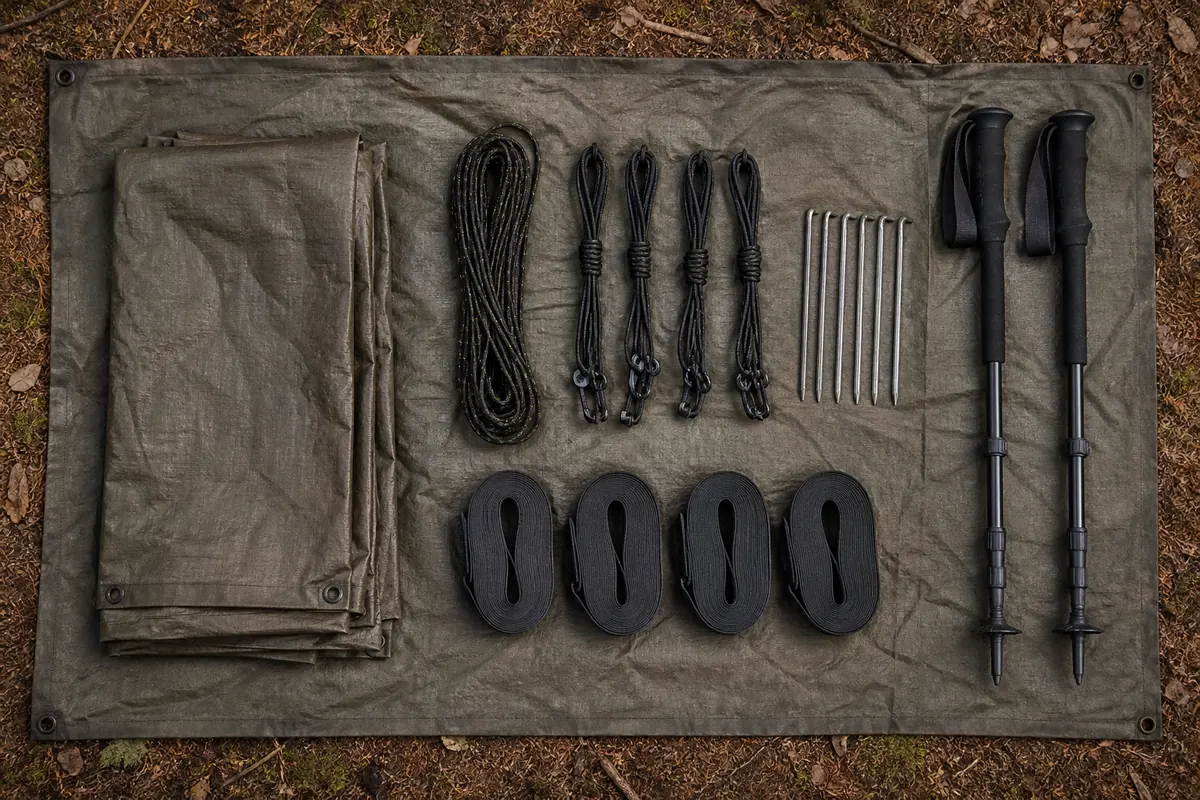
Match your line to its hardware and tie-outs. Very thin cord can be difficult to handle, cut into bark, slip in some adjusters, and concentrate load on small fabric points.
If trees are allowed, use broad protection around healthy trunks and avoid girdling bark with narrow tensioned cord. Never rely on dead branches, loose rocks, or an unsupported trekking pole that can fall onto the protected area.
Keep your tarp folded or rolled so the first structural points can be attached while most fabric remains controlled. This matters when one person is pitching in rain or gusts.
Choose the smallest pitch that answers the weather
Pitch selection decides which direction receives protection, how much air can move, and how many useful anchors the tarp needs. Choose from your forecast and site rather than from visual preference.
| Pitch | Strength | Main limit | Useful starting condition |
|---|---|---|---|
| A-frame | Two shedding panels, familiar geometry, good lengthwise coverage | Open ends admit driven rain and wind | Steady rain with manageable wind and two ridge anchors |
| Closed-end A-frame | One lowered or folded end reduces wind-driven rain | Less entry space and ventilation | Rain with a consistent wind direction |
| Lean-to | Broad view, ventilation, quick working shelter | Exposed to weather from the open side | Mild weather, shade, or a windbreak facing away from conditions |
| High canopy | Headroom and group working space | Large wind exposure and weak rain protection at the edges | Calm weather over a kitchen or daytime rest area |
An A-frame is a useful first pitch because the ridge creates two simple water-shedding panels.
It still needs correct orientation, sufficient slope, and end protection for wind-driven rain.
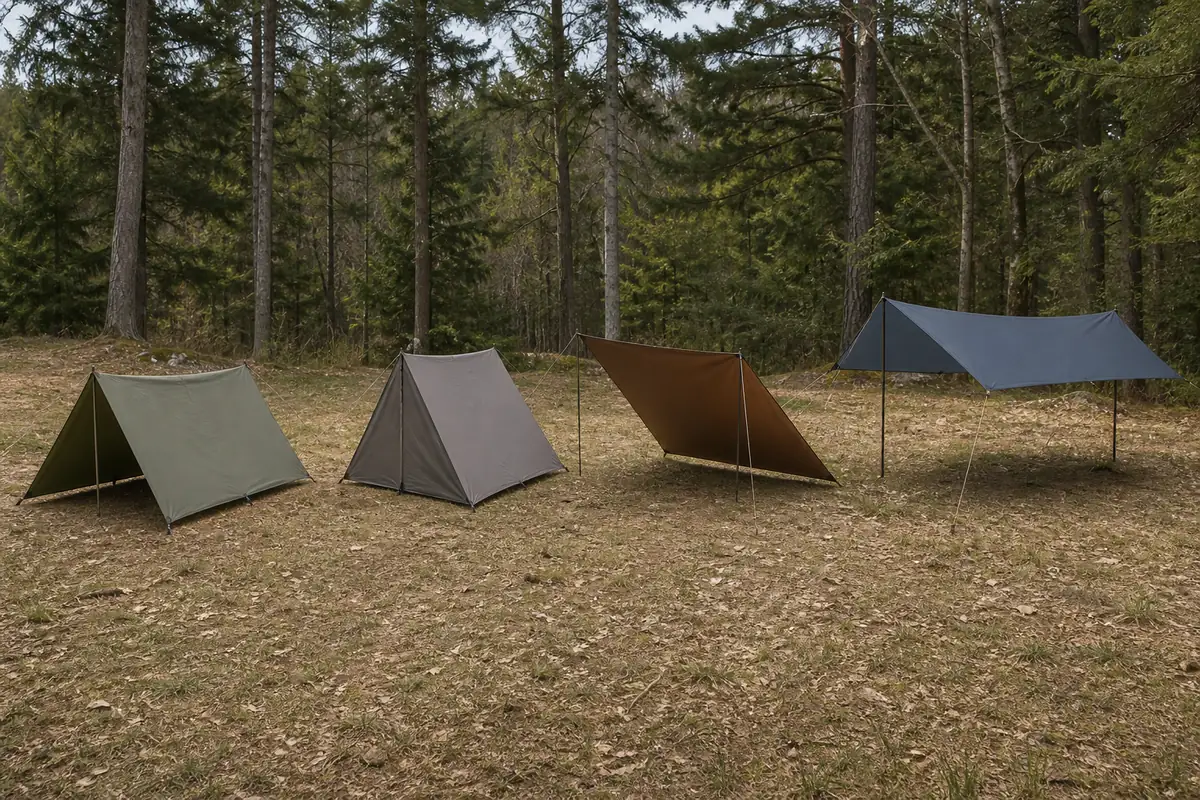
A lean-to can be excellent for shade or a view when weather approaches from behind the low edge. Turn the open face into strong wind and it becomes a scoop.
High pitches create useful working space in calm conditions, but every extra centimetre of height increases exposed leverage. Lowering the same tarp often produces a larger improvement than adding more complicated knots.
Severe or shifting wind, snow loading, exposed terrain, or weather beyond the tarp's design can make relocation or an enclosed shelter the responsible choice. More cord does not erase the limits of fabric area and open sides.
Build the structural line before pulling the corners
The ridgeline establishes height, roof axis, and much of the pitch's load path.
Build it before tensioning the panels so every corner can pull against a stable reference.
- Protect the first anchorWrap a locally allowed broad strap or suitable connection around a sound tree, or stabilise the first pole
- Attach a fixed endUse a secure loop or hardware that will not slide into a weak branch or sharp edge
- Run the line through the roof axisKeep it clear of abrasion and align it with the tarp ridge points
- Build an adjustable second endUse a trucker's hitch, compatible tensioner, or another releasable system you can retension
- Centre the tarpAttach or slide the ridge points until usable coverage sits over the intended footprint
- Tension until stable, not rigidRemove obvious slack while leaving capacity for corner adjustment and wet-fabric change
When the tarp hangs below a separate ridgeline, use attachments that keep it centred without forcing the fabric against rough bark. When the ridgeline loads the tarp's end tie-outs directly, align those tie-outs carefully so the force follows their reinforced direction.
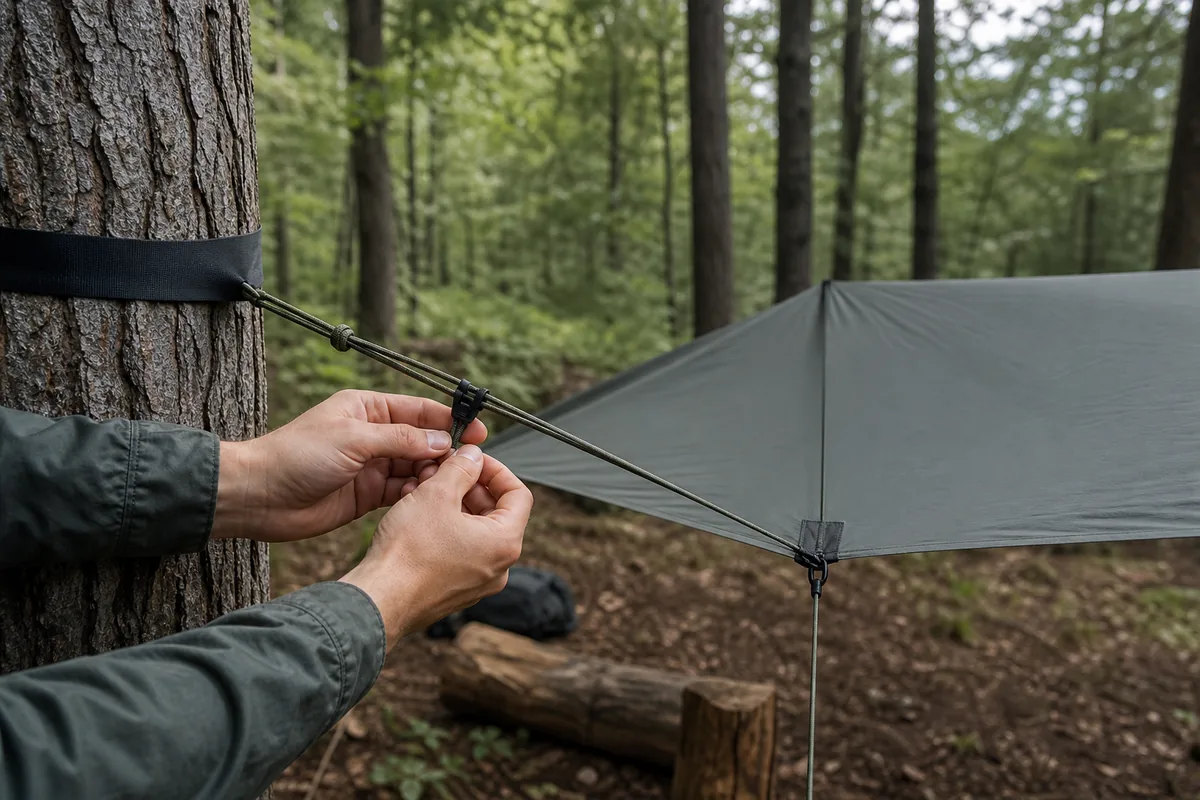
Tree spacing controls usable height and line angle.
If the anchors are too far apart for the available cord or too close for the tarp length, choose another site instead of extending a marginal connection.
With trekking poles, stabilise each pole so a slip does not drop a hard tip into the sleeping area. Handles up or tips protected can reduce puncture risk, depending on the pole and tarp attachment.
Do not over-tension the bare ridgeline before the corners share load. A line pulled guitar-string tight can overload anchors and leave too little adjustment for the finished shape.
Tension opposing corners instead of chasing one loose edge
Stake the first pair of opposing corners along the directions the fabric naturally wants to pull.
Add the other pair only after the first panel has a clear load path, then alternate small adjustments across the shelter.
- Extend the first corner along its load lineFollow the reinforced seam or panel direction rather than pulling sideways
- Seat a suitable anchorDrive the stake for the soil and line angle, or build a secure rock, log, sand, or snow alternative
- Set the opposing cornerPull enough to define the panel while keeping the ridgeline centred
- Add the remaining cornersPreserve symmetry only where the site and pitch actually require it
- Alternate tensionMake short changes across opposite points instead of fully tightening one corner
- Inspect the whole panelLook for straight load lines, loose pockets, distorted seams, and moving anchors
The guyline should continue the force direction from the tie-out. A line pulled sharply sideways can wrinkle the panel, load stitching unevenly, and make one tight edge coexist with a loose centre.
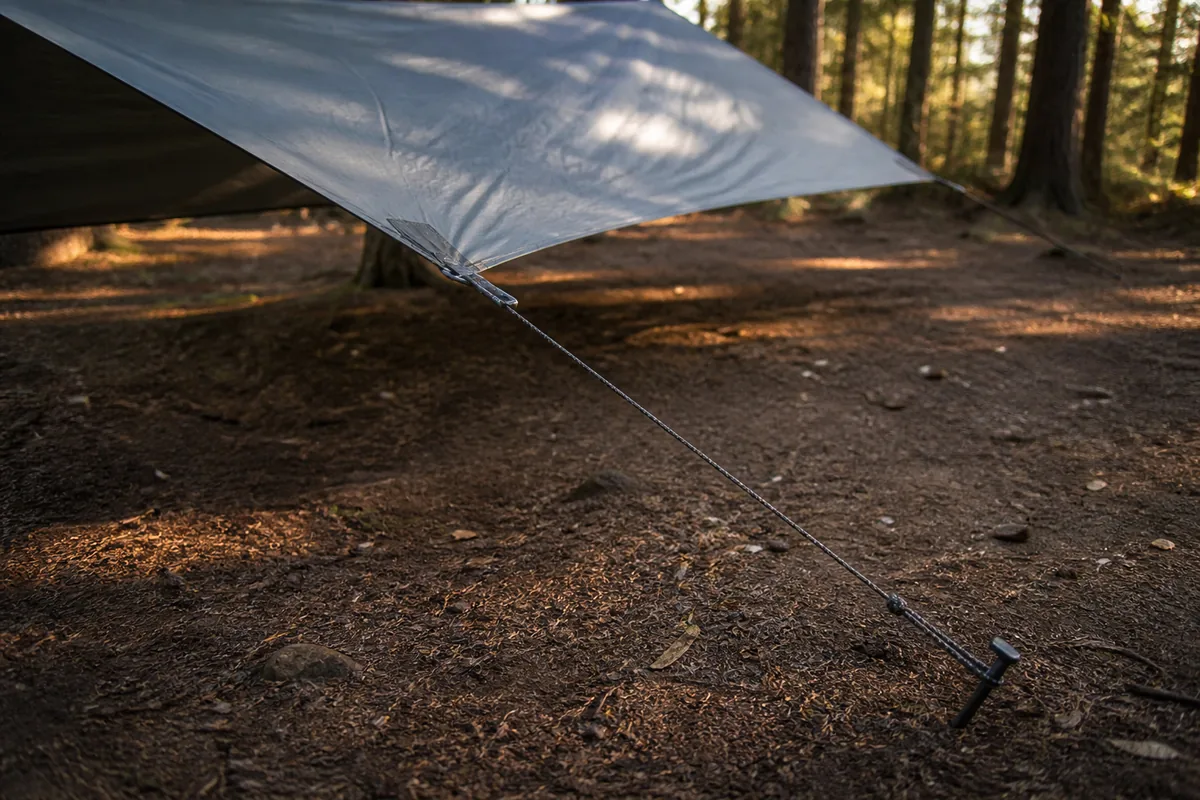
Stake angle depends on soil and line pull, but the anchor must resist the direction of force rather than merely look vertical.
Load the line gradually and watch for rotation or creep before trusting the shelter.
In shallow soil, rock, sand, or snow, use an anchor designed for that material. Moving to a better anchor position is often safer than overtightening a stake that has already begun to creep.
Stop when the panels shed water and remain stable, because a rigid surface can concentrate gust load at one tie-out without improving the shelter.
Give rain one uninterrupted path to the ground
Rain protection depends on a continuous slope from ridge to drip edge and a protected footprint outside the splash and runoff zones. Flat pockets collect water until the fabric stretches or the load transfers suddenly.
Lower the ridgeline or edges to steepen the panels when wind-driven rain increases.
Keep enough separation between the fabric and sleeping system that sagging wet material does not touch insulation.
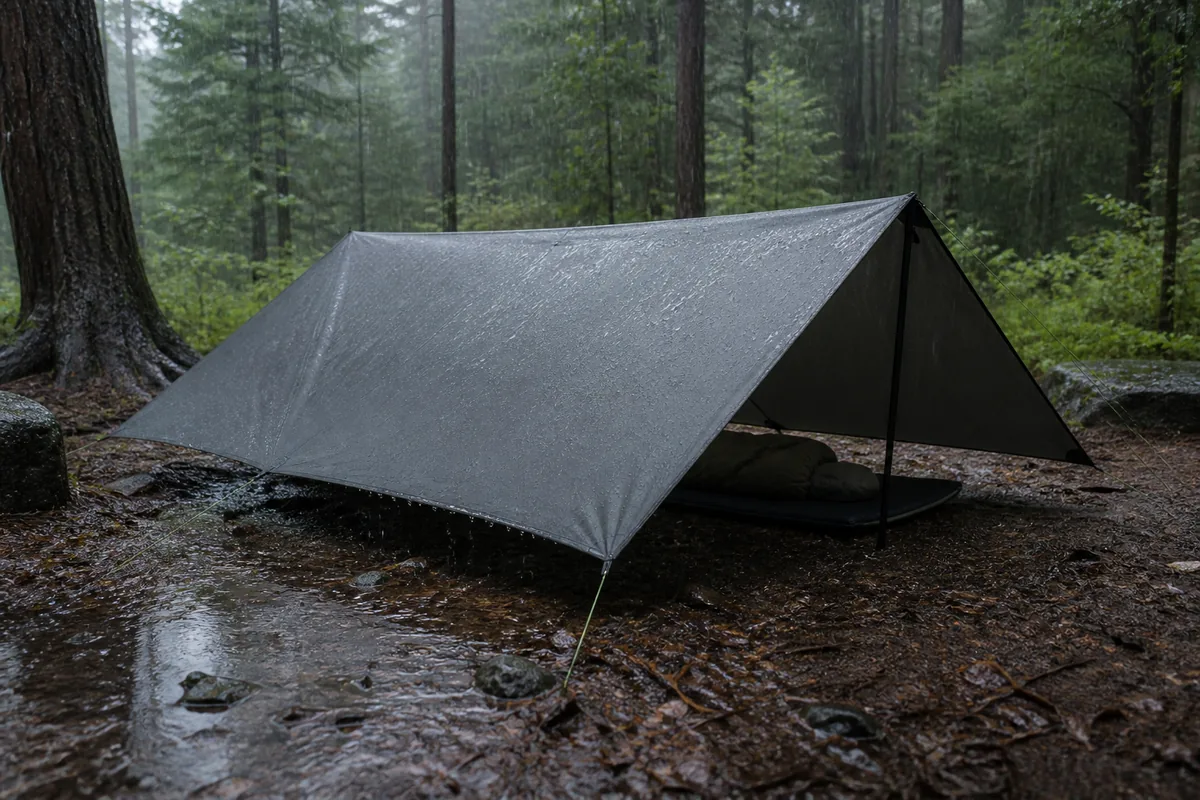
Inspect the full water path. A corner can shed correctly while the middle edge drips onto the groundsheet, or a dry roof can drain into a channel that crosses underneath.
Close or lower the windward end when rain is driven along the ridgeline.
Keep the leeward opening only as large as ventilation, entry, and splash control allow.
Low pitches reduce airflow and usable volume, so manage condensation. Avoid pressing sleeping bags against wet fabric, keep vents or safe gaps where the weather permits, and wipe internal moisture before it reaches insulation.
Retension after the fabric becomes wet, since some tarp materials absorb water or relax more than others.
Use small adjustments across opposing lines instead of applying extreme force at one point.
Turn a low edge into the wind, not an open mouth
Present the smallest supported profile to the prevailing wind. A low or closed edge divides and sheds airflow, while a tall unsupported panel transfers a larger force into fabric, guylines, and stakes.
Windward edge
Lower it, shorten leverage, and support available tie-outs without creating a flat pocket
Leeward opening
Preserve the smallest useful entry and ventilation gap on the sheltered side
Broad panels
Avoid turning an unsupported face perpendicular to gusts when another orientation is available
Guylines
Align them with reinforced load paths and give high-load points sound anchors
Loose equipment
Secure cord tails, bags, poles, and cooking items before they become hazards
Escape threshold
Move or change shelter when anchors creep, trees become unsafe, or wind shifts beyond the pitch's protected direction
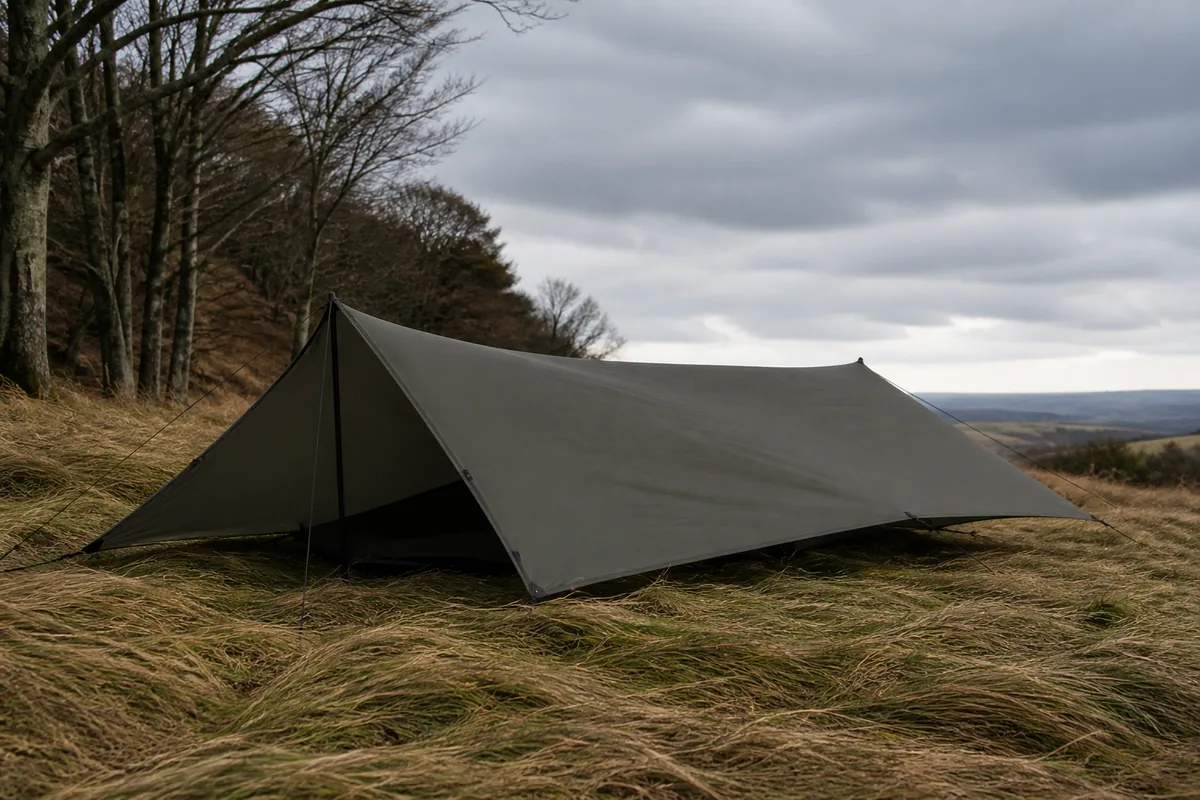
Shortening a windward line is useful only if the new angle continues the fabric load path. Moving the stake closer can also reduce clearance and make the panel flatter, so inspect the whole shape after each change.
Use additional panel tie-outs only when the tarp provides reinforced points and the anchors can share load. Attaching cord to unsupported fabric or improvising a hard clamp can tear the material.
Wind direction can change overnight. Before sleeping, identify the signs that will wake the group and the simplest safe response, such as lowering one side, moving to a safer site, or abandoning the pitch for an enclosed shelter.
Do not camp beneath suspect trees for the sake of a windbreak. The shelter may feel calmer while branches and trunks above it receive greater load.
Diagnose the shape before tightening another line
Each visible failure points to a limited set of causes. Name the shape first, then adjust the line or anchor that owns it.
| Observed failure | Likely cause | First correction |
|---|---|---|
| Centre sag | Ridgeline slack, wet-fabric stretch, or corners pulling the ridge inward | Retension the structural line slightly, then rebalance opposing corners |
| Water pocket | Panel angle too shallow or one edge creating a basin | Increase continuous slope and move the drip edge outside the footprint |
| One flapping panel | Unequal opposing tension or a broad face meeting the wind | Reorient when possible, then align and balance the responsible guylines |
| Stake creeping | Unsuitable soil, shallow placement, or excessive line force | Unload the point and choose a stronger anchor or different position |
| Distorted tie-out | Guyline pulling across the reinforced direction | Release tension and realign the anchor with the fabric load path |
| Ridge drifting sideways | One corner pair or ridge attachment overpowering the opposite side | Loosen the dominant side before centring and retensioning |
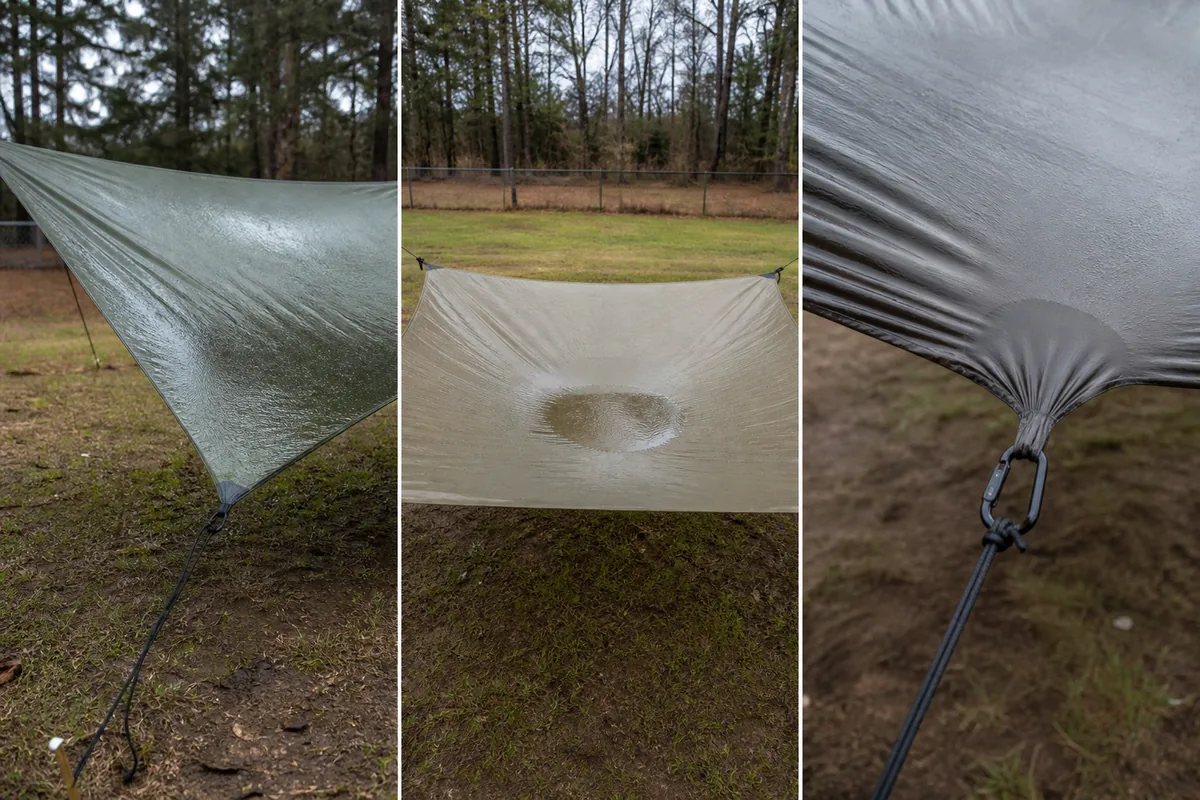
Walk around your tarp instead of judging from the entrance. The hidden windward corner or uphill drip edge often explains a problem visible elsewhere.
Unload a damaged tie-out, torn seam, failed anchor, or unstable support before repair. Tension is stored force, and hardware can move suddenly when a knot or fabric point releases.
Make one small correction and observe your entire shelter. Multiple simultaneous changes erase the connection between cause and result.
Practise one pitch until the order survives bad weather
Start with one A-frame or another pitch suited to your tarp and repeat it in calm daylight. The goal is a sequence you can reproduce when cord is wet, light is fading, and the fabric wants to move.
- First practiceIdentify every tie-out, line, knot, and anchor while following the setup order slowlyMissing knowledge appears without weather pressure
- Second practicePitch from the packed state without rearranging gear beforehandThe storage layout begins to support the real sequence
- Timed practiceSet a reasonable time while preserving site and anchor checksSpeed comes from familiarity rather than skipped decisions
- Wet or windy practiceUse safe controlled conditions and stop before anchors or trees become hazardousThe camper learns fabric behaviour and line handling before a trip
- Pack-downShake off water, separate the wet tarp from dry insulation, and coil lines by functionThe next setup begins organised instead of tangled
- At homeDry completely, inspect seams and tie-outs, clean as the maker directs, and repair damageStored moisture and small failures do not reach the next trip
Pack the ridgeline and corner lines so the first required connection appears first. Separate removable lines by function or keep them attached in a controlled way that does not produce knots in storage.
Temporary wet packing is sometimes unavoidable. Carry the tarp outside the dry compartment or in a separate bag, then open and dry it as soon as practical.
Repeat the same diagnosis used in the field. Inspect abrasion points, stretched loops, bent stakes, slipping adjusters, and cord that became difficult to release under load.
A reliable tarp setup is not the most elaborate one. It is the pitch whose site choice, weather direction, structural line, corner tension, and exit threshold you can explain before the rain begins.
Sources
The A-frame, closed-end pitch, ridgeline, knot functions, corner staking, and adjustment principles follow REI's guide to setting up an ultralight tarp shelter.
The basic tarp, cord, anchor, and peg sequence is supported by Parks Canada's camp setup guidance.
Site selection and surface protection follow Leave No Trace guidance on travel and camping on durable surfaces and leaving natural features undamaged.
Step by stepPractical steps
- Read runoff, wind, overhead hazards, durable ground, and available anchors
- Lay out the tarp, ridgeline, guylines, protected anchors, and stakes before exposing the fabric
- Choose an A-frame, closed-end A-frame, lean-to, or canopy from weather direction and protection needs
- Build and centre an adjustable structural ridgeline between protected trees or supported poles
- Stake opposing corners along the reinforced fabric load lines
- Retension in small alternating passes and inspect the full rain and wind path